Apart from ensuring the conformity of the process and the quality of the product, professional calibration, first and foremost, improves the quality of the process
At many plants in the chemical process industries (CPI), measurement instrumentation is usually calibrated during scheduled maintenance downtimes. This basically means that metrological requirements are regarded as secondary to operational needs. The objective seems to be to produce a complete set of calibration certificates to pass the next audit again. Although this approach seems to be practical, in fact, it misses the point: professional calibration management is aimed at safe and efficient production processes and optimal product quality.
Why calibrate?
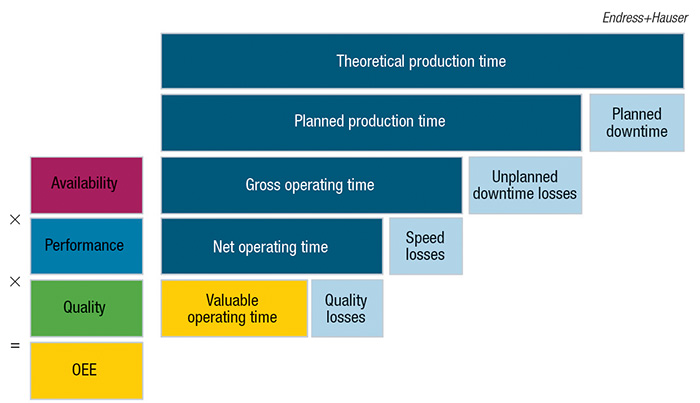
Calibration should not be considered primarily as a means to obtain a certificate for regulatory reasons. Calibration is much more than just a question of compliance. Rather, it affects the overall equipment effectiveness (OEE), and lacking or inadequate calibration might result in increased expenditures.
Availability, performance and quality are the quantifiable components of OEE (Figure 1). All of these three can be affected by incorrect measurements. Availability may be impacted where failing devices might result in shutdowns. Performance suffers when drifting measurements call for corrective actions time after time. In addition, incorrect measurements may be responsible for waste in raw materials or production loss.
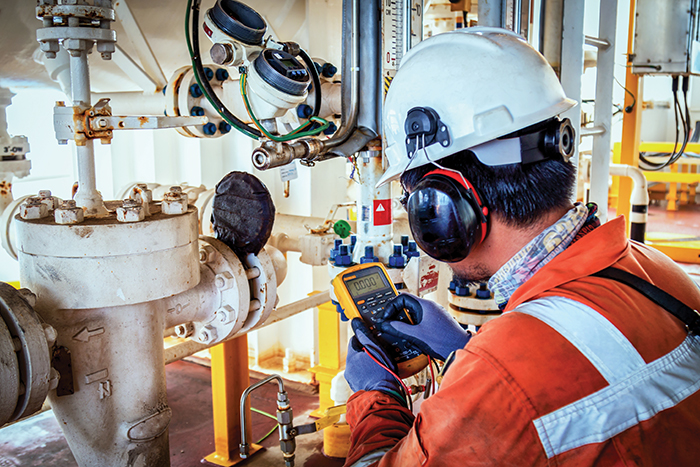
Figure 2. Maintenance and calibration are inevitable costs associated with instrumentation
Of course, process instrumentation does not come for free. There are the inevitable direct costs of maintenance and calibration, for example (Figure 2). But on the other hand, apart from the above-mentioned issues arising from poor measurements, working with inaccurate readings can cause unnecessarily high consumption of energy and raw materials.
To avoid the numerous details of common textbook knowledge we would like to simply summarize the purpose of calibration as follows, just to provide an operational definition: those who calibrate a measurement instrument are determining whether and to what extend the measured value deviate from the reference value given by a measurement standard. If the deviation exceeds the tolerance – generally called maximum permissible error (MPE) – the instrument likely needs to be adjusted, repaired or replaced. This applies to all types of measuring devices, whether they measure physical quantities, such as flow, pressure and temperature, or chemical parameters, such as pH, conductivity, dissolved oxygen and so on. The calibration method for both of these groups and even for each individual measuring principle is different, but this is a secondary aspect. What all instruments have in common and what can be regarded as the actual objective of calibration is that we have "to ensure their [that is, measuring instruments] continuing fitness for their purpose," as per ISO 9001:2015§7.1.5.
A sound approach to calibration
As already stated, calibration is not primarily about obtaining a certificate. It should support the way to the optimal OEE. A reasonable approach to calibration is illustrated in Figure 3.

Figure 3. An approach to calibration is outlined here
The most decisive aspect of a proper calibration strategy is the criticality of each measurement point. The responsible persons, for instance calibration or maintenance managers, need to ask: what does my production process require? They should pay especially close attention to measurement points that are critical for a smooth-running process, safety, energy consumption and product quality. This also applies where an inaccurate analysis value would cause a valuable product batch to be discarded.
Another important consideration is related to instrument tolerance. Although there are measurement points where the acceptable measurement error is relatively high, there are others where this is not the case. This problem is addressed through the specification of the MPE that should be defined with respect to the process requirements.
In most cases, the determination of the MPE reflects a complex set of considerations, which in turn means that it cannot be solely the responsibility of the maintenance manager but should involve other experts as well, such as factory engineering, quality assurance, safety and so on. It is essential that the maintenance manager, or whoever else oversees the calibration or recalibration, involves the process owner or plant operator in order to incorporate their know-how and experience regarding the process. Quality management can also make a valuable contribution on a consistent basis. After all, calibration is an important part of quality assurance.
Calibration intervals
In many instances, maintenance managers, when inquiring about the appropriate calibration intervals, expect a standard answer that applies equally to every instrument in the installed base. While this corresponds well to the scheduled maintenance and service downtimes, it does not support the overall goals of calibration. Even the relevant standards do not specify exact intervals. Instead, they merely suggest, in the words of ISO 9001, that "measuring equipment shall be calibrated or verified, or both, at specified intervals, or prior to use, against measurement standards traceable to international or national measurement standards." Consequently, the organization is responsible for determining and establishing suitable calibration intervals.
When determining the appropriate calibration intervals, it is very important to realize that a "one fits all" strategy does not work. To determine the adequate interval for each instrument, the following aspects must be considered:
- Device type and its sensitivity to drift
- Criticality of the measuring point
- MPE
- Aging of instrument
- Individual process and environmental characteristics
Consequently, calibration intervals cannot be the same for all cases and cannot be static over the instrument's lifetime.
Indeed, it is not uncommon for older instruments to tend more towards drifting. Also, process conditions, such as a high-temperature environment that impacts electronic components, can also cause the measurements to be less stable. In chemical processes, it is often the products themselves that put a heavy strain on the instruments, for example, when they are highly corrosive. This clearly shows that only dynamic intervals can factor in all those aspects. In that respect, measured values during calibration shall be taken into consideration and not only the conformity statement, as they reflect the behavior of the measurement instrument.
Setting the calibration frequency for each measuring device is a matter of risk management in finding the optimal balance between cost and risk. Calibration is therefore not a pure burden, as it is perceived by many plant operators. Instead, it represents more of an opportunity, because at the end of day it leads to improved and more reliable processes.
Performing calibrations depends on an even deeper understanding of the installed base. Although that should be obvious, it's often not the case.
Interval optimization
Keeping a comprehensive inventory and description of each and every instrument and measurement point is the first stage of the process. Once the installed base of instruments has been inventoried and documented, including the required calibration intervals, it is still too early to begin the calibration itself. Of major significance for proper calibration processes are the standard operating procedures (SOPs), which must be created, reviewed and if necessary, modified. This is not only important for the audits. What must be determined is the number of respective calibration points, as well as the measurement uncertainty that can be tolerated. Which calibration method will be selected? Which reference instruments will be used? Which requirements regarding conformity should be considered? Within the entire calibration process, there is often a lot of hidden potential for increasing efficiency. The logistics and the workflow management related to calibration should not be underestimated. Furthermore, calibration managers must make sure that the employees who will be carrying out the actual calibration are thoroughly trained.
Calibration managers who are not only able to provide the auditor with a thick stack of certificates, but have also understood why they chose specific instruments, calibration intervals and calibration methods, will be well-prepared for the next audit. They can thus avoid embarrassing scenes like this: The auditor asks a question about the calibration of a specific instrument, after which the calibration manager begins to feverishly look for the corresponding certificate in the hope of finding the answer. However, those who have pursued these tasks with a high level of expertise in the field of measurement technology and metrology and taken the aforementioned recommendations to heart, will not have to hesitate to provide the auditor a competent answer.
Deviation management
Deviation management means triggering a response in cases where calibration indicates that the measurements are out of tolerance or that significant drift is occurring. At a minimum, the affected instrument needs to be readjusted and recalibrated. Under certain circumstances, an impact analysis must be carried out to examine the quality deviations of the product or the environmental requirements. This task is too often neglected. As per experience, we observe that almost only the pharmaceutical industry addresses these issues properly.

Figure 4. A standard operating procedure (SOP) for calibration can specify the need for cleanroom conditions
Performing calibrations
Performing calibration is not a trivial task (Figure 4). One path to professionalizing calibration management, and the calibration process itself, can lie in enlisting the support of a calibration service provider. This can be a reasonable approach, especially if the metrology competence is not available in house. The ideal situation is when the company has a specially trained, experienced calibration manager, but it is by no means the standard in industries such as the chemical industry.
Considering the complexity of calibration management and the calibration process itself, many process owners choose to go with an external calibration service provider. Service providers can do more than carry out the calibration, however. They can support the calibration management process by becoming involved in the development of the SOPs as an example (Figure 4). Or they can provide essential help with the definition of proper calibration intervals. Providers of the relevant services can become an important partner. Acting as a trusted advisor, they provide measurement technology expertise that operators frequently lack. They can translate the requirements of the process, which only the operator is fully aware of, into the requirements of the measurement technology and the calibration process.
Benefits of accreditation
When selecting a service provider, it is essential to keep one thing in mind: the calibration technician will have an influence not only on the calibration of the instrumentation, but at the end of the day on the production process itself. Only the right partner will carry out this task in a responsible manner. While it may sound trivial, the most important characteristic properties of a service provider in this field are expertise and proficiency. Those who want to be sure that the calibration service provider knows what they are doing should pay attention to the accreditation, in line with ISO/IEC 17025, which is furnished by third-party organizations such as DAkkS (Germany), SCS (Switzerland), A2LA and NVLAP (U.S.) or CNAS (China). This is not to be confused with ISO 9001 certification, which merely verifies the existence of a quality management system.
ISO/IEC 17025 accreditation is always related to specific measurement parameters, such as the calibration of pressure, flow and temperature instrumentation. It also refers to certain measuring ranges and calibration procedures and shows the suitability up to a smallest measurable uncertainty. What is important is that it verifies the necessary traceability, as well as the expertise of the service provider. During an ISO 17025 audit, one of the auditors examines the quality management system (QMS). Another technical specialist assesses the professional skills of the employees responsible for performing the calibrations. The accreditation process is extraordinarily precise, and ultimately conveys trust in the expertise of the service provider's employees. If a service provider is unable to provide the relevant accreditation, it becomes the responsibility of the organization to perform their own audit to ensure that the service provider's employees do possess the necessary expertise and follow best practices for calibration in line with ISO 17025.
The calibration service provider must be focused on the technical conditions and the plant's individual requirements. Apart from providing traceable calibration for the installed base, the calibration partner also supplies precise and comprehensive calibration certificates.
Traceability in accordance with international standards is a requirement from ISO 9001, applicable in the chemical industry. This is set out in section 7.1.5 (monitoring and measuring resources) of the standard. Calibration of the reference instruments must be carried out with traceability in mind (Figure 5). If the service partner is ISO 17025 accredited, the traceability of the calibration is guaranteed. Without accreditation however, the calibration partner has to separately demonstrate proof of traceability. That means first and foremost being able to provide the calibration certificates for the reference instruments used. In addition, not only the reference device must be traceable, but also comprise documentation of measurement uncertainty, procedure, technical competence, metrological traceability to the SI ( Système international or international standard) units, and calibration intervals (see ILAC P-10:2002).
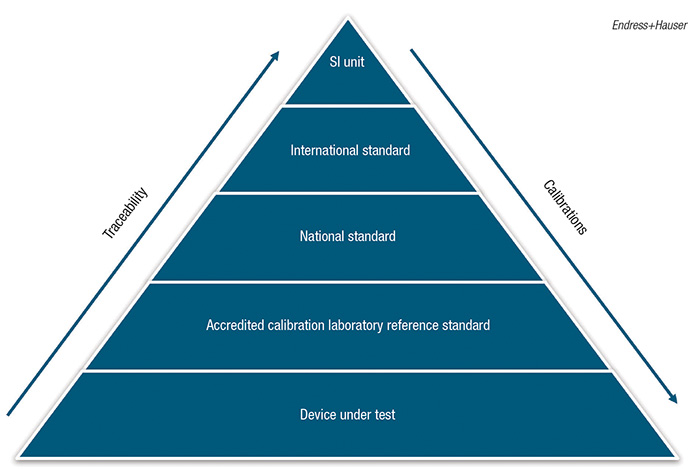
Figure 5. Calibration of reference instruments must be carried out with traceability in mind
Time-saving methods
Calibration requires some amount of time. Calibration runs that can be arranged as part of regular maintenance works or scheduled downtimes will not affect manufacturing, but experience shows that this is a desired, but seldom achieved, scenario. This is precisely the reason why calibration should always be performed in a time-optimized manner. On-site calibration (Figure 6), for example, reduces the coordination effort as there is no need to remove and send the instrument to a calibration facility. Of course, traceability must be given even under these conditions. Even necessary adjustments or repairs of a device may under certain circumstances be carried out on site.
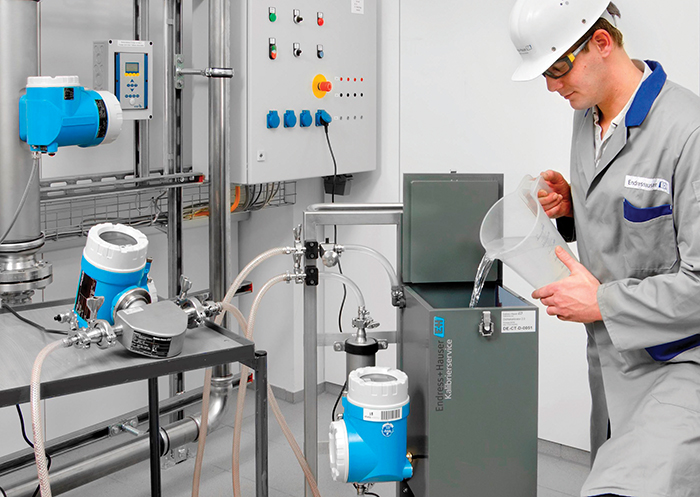
Figure 6. On-site density calibration can save time by eliminating the need for sending an instrument to a calibration facility
Some instrument types can also be calibrated in line. In this case, the instrument remains mounted and installed in its working position. The difficulty in this scenario lies in installing a reference meter in the process line, up- or downstream of the instrument to be calibrated, such as a flowmeter. This again will usually interrupt production, simply because lines have to be opened to install the reference instrument. In addition, the flowmeter of our example is usually calibrated with water, which might require rinsing of the original media first.
Another time-saving method is the multiple calibration of instruments such as thermometers, which involves the use of an oil bath. Less common are self-calibrating thermometers that ensure long-term measurement consistency by means of a highly precise and permanently stable internal fixed-point reference. This requires neither instrument removal nor interruption of the process. This type of calibration is particularly advantageous in hygienic and aseptic applications.
Unique situations can arise with special types of analysis instruments, like pH sensors, that operate with "smart" technologies. The sensor can be precalibrated under laboratory conditions using traceable buffer solutions. The existing sensor is then swapped out for a newly calibrated sensor, which saves time as well.
Toward integrated intelligence
While integrated systems that increase measurement reliability are the exception rather than the rule, many manufacturers are actively working to increase the metrological quality of their instruments. The goal is to be able to determine the quality of a measurement value not only at the time of calibration, but at any time while the instrument is being used. In this respect, periodic calibration is merely an aid in determining the metrological performance of an instrument. There are already self-diagnostic alternatives that verify measurement instrument performance at any time without interrupting the process, supply valuable data that make it possible to carry out predictive maintenance, and even optimize the production process. By allowing insights into the current state of the measurement instrument, self-diagnostics can also help to precisely plan, or even potentially extend, the calibration cycles. It is also advisable to combine these types of diagnostic technologies with the opportunities that artificial intelligence and the industrial internet of things (IIoT) offer. This increases reliability, which can then be used to predict when a calibration is required or potential instrument damage.
Putting it all together
Professional calibration means a lot more than satisfying the auditor with a stack of certificates. Apart from ensuring the conformity of the process and the quality of the product, professional calibration first and foremost improves the quality of the process. This leads to safe processes that run with a high degree of efficiency, plus proper reporting that can be used for pinpoint optimization.
The basis for professional calibration is to bring together the competencies for the production process, quality assurance, process safety and metrology to do the necessary calibration work – nothing more, nothing less. The question of appropriate calibration intervals should not be paramount. Instead, the focus should be on how to ensure the consistent process stability and the constant availability of the necessary measured values in the appropriate quality. If you optimize your existing calibration intervals keeping the above in mind it may lead to significantly increased calibration intervals for certain instruments and reduced intervals for others. But even if it leads to more frequent calibration, you will ultimately achieve an optimum with the least possible use of resources – which basically means that your installed base will gain a higher degree of reliability.
Furthermore, those who understand how to utilize the opportunities that (self) diagnostics and digitalization offer with regard to quality and calibration management are in a better position to design their production systems for the future. The extensive basis of data that the intelligent measurement instruments provide, combined with artificial intelligence and IIoT, helps to provide operators with support over the long-term. This will eventually not only drive down costs, but also allow for proactive management of deviations and countermeasures as well as optimizing the instrumentation, thus making significant progress toward operational excellence.
Authors
 Dimitri Vaissiere works as an expert data scientist in the Service Innovation division at Endress+Hauser (Deutschland) AG+Co. KG (Colmarer Strasse 6, 79576 Weil am Rhein, Germany; Phone: +49-7621-975-01; Fax: +49-7621-975-555; Email: dimitri.vaissiere@endress.com). He holds a doctorate in engineering sciences from the University of Strasbourrg, France. He has been working for the company since 2010 and spends his free time with boxing or with his children hiking.
 Pia Höfflin is a service product developer at Endress+Hauser (Deutschland) AG+Co. KG (Colmarer Strasse 6, 79576 Weil am Rhein, Germany; Phone: +49-7621-975-01; Fax: +49-7621-975-555; Email: pia.hoefflin@endress.com). She joined the company in 2014. Currently, she is responsible for developing maintenance optimization and calibration optimization services. Höfflin holds an engineering degree from DHBW Lörrach, Germany. She enjoys travelling through Europe and exploring new places.
